
Monday, May 17, 1915
On the march, departing from Mont Bernenchon
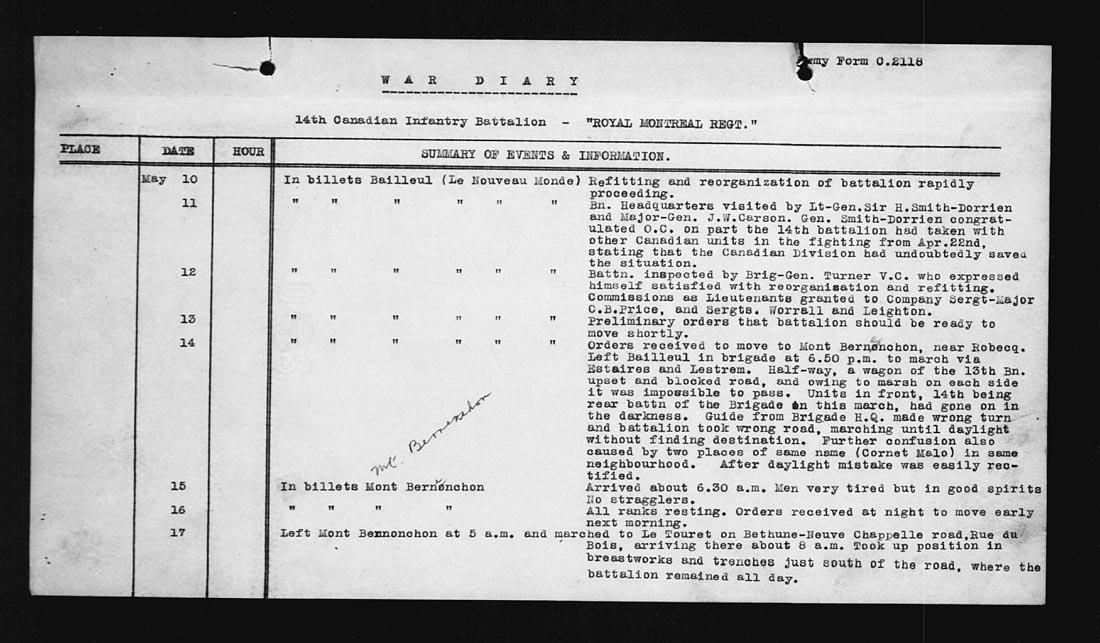
The Battalion War Diarist wrote for this day: “Left Mont Bernenchon at 5 a.m. and marched to Le Touret on Bethune-Neuve Chappelle road, Rue du Bois, arriving there about 8 a.m. Took up positions in breastworks and trenches just south of the road, where the battalion remained all day. Rained continuously. Saw 4th Guards Bde. and Indian troops march by going into trenches at Festubert. Ordered back to billets at Essars, near Bethune. Left Le Touret at 9 p.m. and arrived at Essars about 10:30 p.m. Raining. After arriving there received orders to be ready to move at 15 minutes notice.” [1]
THIS DAY IN RMR HISTORY: The Battalion’s interest was aroused by the sight of the Gurkhas, “with prisoners, moving back from the line, and the 4th Guards Brigade marching into action. The Guards, as always, afforded a splendid sight, and the Gurkhas, with their famous ‘kukris’, aroused the Canadians curiosity. The sacred ‘kukri’ knife, rumour had stated, was never drawn without the shedding of blood, even if the owner had to nick his own person to satisfy the weapon’s sanguinary honour. Alas! this fascinating legend soon faded into the limbo of abandoned beliefs, as several Gurkhas drew their kukris and unromantically proceeded to chop firewood. The brown men’s reputation for being quick with the knife was maintained, however, when a Gurkha leaped at a German officer prisoner who had contemptuously refused a proffered cigarette. Prompt interference alone saved the German’s life. Brig.-General Turner visited the Battalion at this time, apologetically explaining that he had been unable to arrange for a fight that day, but promising the men that they would see action on the morrow.”
“For the Canadian battalions, the battle promised new challenges: The Battalions were to attack over a country we had never seen before, and depended on guides from the troops in line, rather than on the inaccurate map, which showed the same symbol for hedges, paths and ditches – and was printed with the south at the top and the grid inverted. Points of interest, such as buildings and road junctions, were marked with letters and numerals within a circle – e.g. M10 encircled, pronounced Emma ten.”[3]
“Haig’s orders were not issued until mid-afternoon and received by the infantry brigade as Zero Hour approached. The two-hour preliminary bombardment was an hour late in starting, originally scheduled for 2:30 p.m. The Canadian attack did not go forward until 5:25 p.m. by which time the Guards Brigade had already been halted by German machine-guns – scarcely touched by the British artillery due to their positions still not having been precisely located.”[4]
 ARMCHAIR QUARTERBACKING AFTER THE ACTION: “The British attacks of 15-16 May compelled the [German] 14th Infantry Division to withdraw from its forward positions north of La Bassée Canal. Encouraged by the results, Haig ordered a follow-up attack for the afternoon of 18 May. This was to include the 14th and 16th Battalions of Brigadier-General Turner’s 3rd Infantry Brigade, to be deployed under the command of the 7th Division until the rest of the 1st Canadian Division arrived in the sector. Turner’s brigade was detailed to capture Quinque Rue, the North Breastwork, and the entire Orchard (fig. 9.5).
In the meantime another veteran German division, the 2nd Guards Reserve – considered by Allied intelligence officers to be a first-class outfit – reinforced the attenuated 14th Division. Now there was no time to lose. The British and Indian forces that opened the Festubert offensive had several days to organize and coordinate their attacks. In contrast, the Canadians found themselves repeatedly committed to battle with only hours to plan.
The men of the 14th Battalion (RMR) spent 17 May in the forward breastworks – little more than wicker screens heaped up with earth. The following morning, after a night of fitful rest, they assembled near Indian Village under the command of Lieutenant-Colonel William Burland, a twenty-year pre-war militia veteran. The 16th Battalion formed up on Burland’s right flank. After a short delay, a pair of companies from each battalion launched an attack that afternoon. According to the plan, two 14th Battalion (RMR) companies and one 16th Battalion company headed directly for Orchard, while a second 16th Battalion company executed a wide flanking manoeuvre towards the North Breastwork. German artillery fire was heavy from the outset. The infantry, consequently, advanced in extended order, with fifty-yard gaps separating each wave and five-pace intervals between each soldier.
An after action report by Captain Andrew Holt, one of Burland’s subordinates, explains that the 14th Battalion (RMR) companies achieved steady progress until the way was partially blocked by troops of the 4th Guards Brigade, who had been held up on the left flank. The 14th Battalion (RMR) changed direction, bringing it into the path of the 16th Battalion. Amid the deafening chaos, Burland ordered his men to dig in, and after some hasty reconnaissance, the 14th Battalion (RMR) troops advanced a few hundred yards further to settle down under shelling that continued until at least 02:00 the next morning. At daybreak Burland’s men pulled back once again, allegedly to achieve closer touch with the 16th Battalion. So far the operation had cost sixty-seven casualties, including two officers.
The 16th Battalion sources tell the story differently than Holt does. According to the war diary, the flank attack was aborted ‘owing to [the] non-arrival’ of Burland’s covering detachments; the 16th Battalion troops, furthermore, reached their ‘assigned line,’ while the 14th Battalion (RMR) men ‘did not.’ Someone from the 16th Battalion reportedly got in touch with Lieutenant-Colonel Burland by telephone, asking him to bring his troops forward to close the gap between the Canadians and the 4th Guards Brigade. Burland initially complied, but then ‘took [the] 14th (RMR) away before daylight and left [a] gap of about 200 yards between [the 16th Battalion] and Guards.’ The opening was covered with a machine gun, before two additional 16th Battalion companies arrived early on 19 May to offer relief. The 16th Battalion frontal assault company lost four men killed and sixty wounded.
Captain Holt’s 14th Battalion (RMR) report makes no mention of a telephone call to Burland, while the 16th Battalion diary narrative is problematic in that it concentrates on what Burland did not do and says relatively less about what the 16th Battalion troops actually accomplished. Fetherstonhaugh’s history of the 14th Battalion (RMR) speaks of difficult terrain, heavy German resistance, and the courage of individual men, but omits further specifics, while Urquhart’s volume on the 16th Battalion claims that the flank manoeuvre against the North Breastwork was aborted only when officers learned from Burland just how poorly the frontal attack had fared. The whole truth probably lies somewhere in between, yet it seems apparent that Burland exercised initiative by evacuating his troops from dangerously exposed positions in front of the Orchard. Had the attack been pressed further, it is probable that both battalions would only have suffered additional needless casualties.” [5]
[1] War Diary, 14th Canadian Battalion, The Royal Montreal Regiment, May 17, 1915. Library and Archives Canada, Ottawa, http://data2.collectionscanada.ca/e/e044/e001089732.jpg
[2] R.C. Featherstonhaugh, The Royal Montreal Regiment 14th Battalion C.E.F. 1914-1925, Montreal, The Gazette Printing Co., Ltd., 1927, pg.54.
[3] Nicholson, Gerald Official History of the Canadian Army in the First World War: Candian Expeditionary Force, 1914-1919 (Duhamel, Queen's Printer and Controller of Stationery, Ottawa, 1964) p.86, as quoted in Festubert 1915, Canadiansoldiers.com http://www.canadiansoldiers.com/history/battlehonours/westernfront/festubert.htm
[4] Duguid, A. Forescue History of the Canadian Grenadier Guards (Gazette Printing Company, Montreal, PQ, 1965) p.84. "Emma" was the phonetic for "M" in the phonetic alphabet of the day. The official history by Nicholson further explains that "On the trench maps in current use topographical features and other tactical objectives were indicated by e.g., J.1, J.2, etc. The letters distinguished narrow sectors of the front in alphabetical order from right to consecutively from the British front line out into enemy territory." (p.88, footnote); as quoted in Festubert 1915, Canadiansoldiers.com http://www.canadiansoldiers.com/history/battlehonours/westernfront/festubert.htm
[5] Andrew Iarocci, “Shoestring Soldiers: The 1st Canadian Division at War, 1914-1915,” Toronto, University of Toronto Press, 2008, pp 202-204